Maintaining Ceiling Lighting Across the Building
For facility managers responsible for commercial buildings across the UAE, the maintenance of the ceiling lighting affects cost, appearance, and the experience of occupants. LED ceiling lighting, while far lower in maintenance than the systems it replaced, benefits from informed maintenance that maximises its life and sustains its performance. This guide examines LED ceiling light maintenance for commercial facility managers across the Emirates.
It covers the fixture types, the maintenance practices, and the strategies that sustain ceiling lighting performance, supporting the facility managers who keep commercial buildings performing across the UAE.
Integrated and Replaceable Fixtures
Commercial ceiling fixtures fall into integrated designs, with the LED built in, and fixtures using replaceable lamps. Integrated fixtures require full replacement at end of life but offer longer life and better performance, while replaceable lamp fixtures allow lamp replacement. Understanding which fixture types are installed across the building enables the facility manager to plan maintenance effectively across the ceiling lighting installation.
Understanding the integrated and replaceable ceiling fixtures enables effective maintenance planning. The integrated fixtures requiring full replacement but offering longer life, and the replaceable lamp fixtures allowing lamp replacement, require different maintenance approaches, knowledge that enables the facility manager to plan the maintenance across the building, supported by long life LED ceiling lamps for commercial buildings.
Cleaning and Light Output
Dust accumulation on ceiling fixtures, significant in the dusty UAE environment, reduces light output over time, often mistaken for fixture degradation. Regular cleaning of the fixtures maintains the designed light output, avoiding the perceived dimming that dust causes. Incorporating fixture cleaning into the maintenance schedule sustains the light output across the ceiling lighting of the commercial building in the UAE.
Specifying regular fixture cleaning sustains the ceiling lighting output. The cleaning that removes the accumulated dust, significant in the UAE environment, maintains the designed output, avoiding the perceived dimming that dust causes, a simple maintenance that sustains the ceiling lighting across the commercial building.
Planned Replacement Strategy
For commercial buildings, planned ceiling light replacement, replacing fixtures across an area at a scheduled point, maintains consistent illumination and enables efficient maintenance. Planned replacement avoids the inconsistent lighting and inefficient intervention of reactive replacement, maintaining the appearance and enabling scheduled maintenance. Adopting a planned replacement strategy maintains the consistent ceiling lighting across the commercial building in the UAE.
Adopting a planned replacement strategy maintains consistent ceiling lighting. The replacement across an area at a scheduled point maintains the consistent illumination and enables efficient maintenance, avoiding the inconsistency of reactive replacement across the ceiling lighting of the commercial building in the UAE.
Group Replacement and Consistency
Group replacement, replacing the fixtures in an area together, maintains the consistency of the ceiling lighting and avoids the variations that piecemeal replacement causes. When individual fixtures are replaced among older ones, differences in output and colour become visible, while group replacement maintains a consistent appearance. Group replacement maintains the consistent ceiling lighting across the areas of the commercial building in the UAE.
Specifying group replacement maintains consistent ceiling lighting. The replacement of the fixtures in an area together maintains the consistency, avoiding the visible variations that piecemeal replacement causes, the group approach that sustains the uniform appearance of the ceiling lighting across the commercial building.
Thermal Environment and Lifespan
The thermal environment of the ceiling fixtures affects their lifespan, with the ceiling void temperature and ventilation influencing the operating temperature. Facility managers should ensure the ceiling void ventilation is maintained and the fixtures are not obstructed, supporting their thermal performance and lifespan. Attention to the thermal environment sustains the ceiling lighting lifespan across the commercial building in the UAE.
Maintaining the thermal environment sustains the ceiling lighting lifespan. The ceiling void ventilation maintained and the fixtures unobstructed support the thermal performance, extending the lifespan in the demanding UAE conditions, the thermal attention that sustains the ceiling lighting across the commercial building.
Emergency Ceiling Lighting Testing
Emergency ceiling fixtures require periodic testing to satisfy the safety regulations, the function and discharge tests verifying the emergency operation. Facility managers must maintain the testing programme and documentation for the emergency ceiling lighting to satisfy the civil defence inspection. Maintaining the emergency testing sustains the life safety performance and compliance of the ceiling lighting across the commercial building in the UAE.
Maintaining the emergency ceiling lighting testing sustains compliance. The function and discharge tests that verify the emergency operation, documented for inspection, satisfy the safety regulations, the testing that sustains the life safety performance of the emergency ceiling lighting across the commercial building in the UAE.
Documentation and Records
Effective ceiling lighting maintenance depends on documentation, records of the fixtures, the maintenance, and the testing. This documentation supports informed maintenance, enables the sourcing of compatible replacements, and evidences compliance. Maintaining good records supports the effective maintenance of the ceiling lighting across the commercial building in the UAE.
Maintaining ceiling lighting documentation supports effective maintenance. The records of the fixtures, maintenance, and testing enable informed maintenance, replacement sourcing, and compliance demonstration, the documentation that supports the effective maintenance of the ceiling lighting across the commercial building.
Sourcing Compatible Replacements
Maintaining the ceiling lighting requires sourcing compatible replacements that match the existing installation, maintaining consistency. Sourcing from the original supplier or a supplier offering consistent products ensures the replacements match the existing fixtures, maintaining the consistent appearance. Sourcing compatible replacements maintains the consistent ceiling lighting across the commercial building over time in the UAE.
Sourcing compatible ceiling lighting replacements maintains consistency. The replacements that match the existing fixtures, sourced from a supplier offering consistent products, maintain the consistent appearance, the sourcing that sustains the ceiling lighting consistency across the commercial building over time in the UAE.
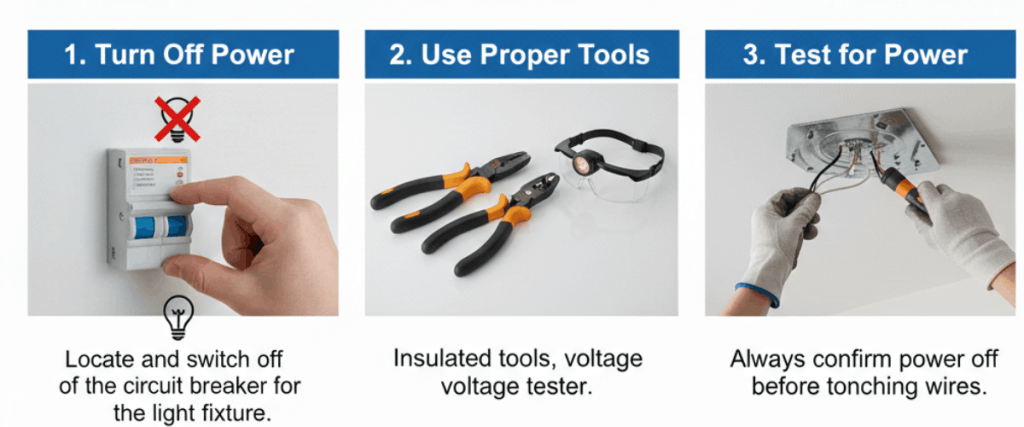
Safe Maintenance Access
Ceiling lighting maintenance requires safe access, particularly for high ceilings, and the practicality of access affects the maintenance. Maintenance with appropriate access equipment, and installations designed with access in mind, enable safe, efficient maintenance. Considering the access supports the safe, efficient maintenance of the ceiling lighting across the commercial building in the UAE.
Considering safe maintenance access supports efficient ceiling lighting maintenance. The maintenance with appropriate access equipment, and the installations designed with access in mind, enable the safe, efficient maintenance, the access consideration that supports the maintenance of the ceiling lighting across the commercial building.
Extending Service Life
The strategies of cleaning, thermal management, and planned maintenance together extend the service life of the ceiling lighting, maximising its value. The ceiling lighting maintained with attention to these factors delivers longer, more reliable service, reducing the lifecycle cost. Adopting these strategies extends the ceiling lighting service life across the commercial building in the UAE.
Adopting the maintenance strategies extends the ceiling lighting service life. The cleaning, thermal management, and planned maintenance together deliver longer, more reliable service, maximising the value across the building life, the informed maintenance that extends the ceiling lighting across the commercial building in the UAE.
Ceiling Lighting Maintenance Support From Tricircle
Supporting the maintenance of ceiling lighting requires a supplier providing consistent, compatible products and replacements over time. As an authorised OPPLE distributor, Tricircle supplies ceiling lighting and compatible replacements across UAE commercial buildings, supporting facility managers in maintaining their installations over the long term.
To discuss ceiling lighting supply, replacements, or maintenance support for your commercial building, contact our team at aysha@tricirclegroup.ae or call +971 50 578 1325. We support facility managers across Dubai, Sharjah, Abu Dhabi, and the wider Emirates with consistent, quality lighting products.